Handling content enrichment in Dynamic Data Mapping Solution

In the first part, we have covered how to handle JSON payloads coming with Varied Field Names Across Different Client Systems in WSO2 Micro Integrator.

In this second part, we will explore how to dynamically enhance the data originating from distinct client systems without the need to create a dedicated data mapper for each one. Each field within the incoming payload might necessitate unique parsing and data manipulation procedures before being assigned to the designated canonical field. Thus, the implemented solution must accommodate various enrichment logics for individual fields.

Let’s employ the same technique that was demonstrated in First Part of the article. To recap briefly, the data mapper functions through a “.dmc” file that contains JavaScript code for data mapping. By making adjustments to this “.dmc” file, we can introduce the required code to dynamically execute JavaScript code, thereby attaining the intended outcome.

Enrichment logic can be defined using JavaScript. Compose a JS script that derives the values based on the input fields within the incoming payload. DataMapper can be modified to execute the JavaScript logic specified for the particular field. A JSON map can be defined and injected to specify the parsing logic for each field in the payload.

Step 1: Create sample JSON file to define datamapper

Create a JSON file containing the following data.

{

“number”:”110001″,

“priority”: “2 – High”,

“location”: “1002 Newyork”

}

<property expression=”json-eval($)” name=”payload” scope=”default” type=”STRING”/>

From the above payload , consider a scenario where the target system requires the numeric value preceding the “-” symbol to be configured for the priority field. Similarly, the location field necessitates only the initial 4 characters.

Step 2: Define the Datamapper

Begin the data mapping process by providing the payload file from step 1 as input. Use the same sample file for both input and output purposes. Next, navigate to the file created in the registry resource project, having the “.dmc” extension, and open it. Inside, you will find the code snippet given below.

map_S_root_S_root = function(){ 

var outputroot={};

outputroot = {};

outputroot.number= inputroot.number;

outputroot.priority= inputroot.priority;

outputroot.location= inputroot.location;

return outputroot;

};

Step 3: Modify .dmc file

Now, change the JavaScript code in the “.dmc” file to execute the dynamic JS script given in the JSON key-value map (given in Step 4) for each required input field name.

Note: After making modifications to the .dmc file, refrain from opening the file or making changes in Integration Studio, as doing so will override custom mapping code with the default settings.

map_S_root_S_root = function(){ 

var outputroot={};

outputroot = {};

outputroot.number=inputroot.number;

outputroot.priority= enrichDynamicFieldValue (DM_PROPERTIES.DEFAULT[‘payload’],’priority‘,DM_PROPERTIES.DEFAULT[‘mappingData’]);

outputroot.location= enrichDynamicFieldValue (DM_PROPERTIES.DEFAULT[‘payload’],’location‘,DM_PROPERTIES.DEFAULT[‘mappingData’]);

return outputroot;

};

enrichDynamicFieldValue = function(payload,canonicalFieldName, mappingData){

var mappingJSON = JSON.parse(mappingData);
script= mappingJSON[canonicalFieldName];
payload = JSON.parse(payload);
return eval(script);

}

The above code introduces a new function called enrichDynamicFieldValue , requiring three inputs: the payload to be converted, the mapping data, and the canonical field name that requires enrichment from the map. To integrate this function, replace the original “inputroot.fieldnames” in the initial .dmc code. By making this substitution, the function will dynamically execute the JavaScript logic as specified in the mapping data for the designated field. Consequently, it will return the enriched value atop the input payload.

Step 4: Define Enrichment mapping payloadfactory

Within the API/Sequence file, before invoking the datamapper mediator, generate a Key-Value payload to define the enrichment logic for the input field names originating from integrating client system within the .dmc file. Store this payload as a property. This property will be utilized within the .dmc file to facilitate the enrichment of the input payload.

Please take note: In this post, we have directly hardcoded mapping payload here; however, in a real project scenario, it should be stored in a database. It is recommended to maintain separate input enrichment mapping payload for each client system in database and retrieve them based on the input system of the respective client.

<payloadFactory media-type=”json”>

<format>

{

    “priority”: “payload[‘priority’].substring(0, payload[‘priority’].indexOf(‘-‘)).trim();”,
    “urgency”: “payload[‘location’].substring(0, 4).trim();”
 }

</format>

<args/>

</payloadFactory>

<property expression=”json-eval($)” name=”mappingData” scope=”default” type=”STRING”/>

Step 5: Testing the program

Time to test the implementation, call the API with below input payload

{

“number”:”INC_12805″,

“priority”: “3 – Medium”,

“location”: “1005-Dallas”

}

The API with help of custom dynamic datamapper will convert the above payload as below

{

“number”:”INC_12805″,

“priority” : “3”,

“location”: “1005”

}

Using this approach, you can generate a output payload for each individual client system and carry out the conversion and enrichment of the payload. This eliminates the creation of new Datamapper code for each integrating system.

Building Dynamic Data Mapping Solution for Parsing JSON Payloads with Varied Field Names Across Different Client Systems in WSO2 Micro Integrator

When developing integration solutions, it is often necessary to handle input source keys or field names that vary between different systems. Unfortunately, the current data mapping solution offered by WSO2 requires defining the input and output fields during the developement phase, without the flexibility to load a dynamic input configuration file during runtime. As a result, this limitation forces the creation of multiple datamapper projects for each integrating system, adding extra development and deployment efforts for each integrating client system.

While there is no direct method available, we can accomplish this task through a non-standard approach. The data mapper operates using a “.dmc” file, which contains JavaScript code to facilitate data mapping. By modifying this “.dmc” file, we can insert the necessary code to load a list of dynamic field names, achieving the desired functionality.

Step 1: Create sample JSON file

Create a JSON file with below data

{

“number”:”110001″,

“description”: “unable to create order”

}

<property expression=”json-eval($)” name=”payload” scope=”default” type=”STRING”/>

Step 2: Define Datamapper

Begin the data mapping process by providing the payload file from step 1 as input. Use the same sample file for both input and output purposes. Next, navigate to the file created in the registry resource project, having the “.dmc” extension, and open it. Inside, you will find the code provided below.

map_S_root_S_root = function(){ 

var outputroot={};

outputroot = {};

outputroot.number= inputroot.number;

outputroot.description= inputroot.description;

return outputroot;

};

Step 3: Modify .dmc file

Now, change the JavaScript code in the “.dmc” file to enable dynamic retrieval of input field names from a JSON key-value map.

Note: After making modifications to the .dmc file, refrain from opening the file or making changes in Integration Studio, as doing so will override custom mapping code with the default settings.

map_S_root_S_root = function(){ 

var outputroot={};

outputroot = {};

outputroot.number=getDynamicFieldName (DM_PROPERTIES.DEFAULT[‘payload’],’number‘,DM_PROPERTIES.DEFAULT[‘mappingData’]);

outputroot.description= getDynamicFieldName (DM_PROPERTIES.DEFAULT[‘payload’],’description‘,DM_PROPERTIES.DEFAULT[‘mappingData’]);

return outputroot;

};

getDynamicFieldName = function(payload, canonicalFieldName, mappingData){
var mappingJSON = JSON.parse(mappingData);
fieldName = mappingJSON[canonicalFieldName];
obj = JSON.parse(payload);
return obj[fieldName];

};

The above provided code introduces a fresh function called getDynamicFieldName, requiring three inputs: the payload to be converted, the mapping data, and the canonical field name to extract from the map. To incorporate this function, substitute the original inputroot.fieldnames in the initial .dmc code. By doing so, the JavaScript logic will retrieve dynamic field names from the mapping data and appropriately process the input payload.

Step 4: Create Dynamic Field mapping payloadfactory

Within the API/Sequence file, before invoking the datamapper mediator, generate a Key-Value payload to establish a correspondence between input field names of integrating client system and the canonical field names specified in the .dmc file. Store this payload as a property. This property will be utilized within the .dmc file to facilitate the parsing of the input payload.

Please take note: In this post, we have directly hardcoded mapping payload here; however, in an ideal scenario, it should be stored in a database. It is recommended to maintain separate input mapping payload for each client system in database and retrieve them based on the input system of the respective client.

<payloadFactory media-type=”json”>
<format>
{
“number”:”incident_no”,
“description”:”desc”

}

</format>
<args/>
</payloadFactory>

<property expression=”json-eval($)” name=”mappingData” scope=”default” type=”STRING”/>

Step 5: Testing the program

Time to test the implementation, call the API with below input payload

{

“incident_no”:”INC_12801″,

“desc” : “Unable to open the website”

}

The API with help of custom dynamic datamapper will convert the above payload as below

{

“number”:”INC_12801″,

“description” : “Unable to open the website”

}

Using this approach, you can generate a fresh Datamapping payload for each individual client system and carry out the conversion. This eliminates the creation of New Datamapper code for each integrating system.

Internet of Things with Arduino & Carriots M2M Cloud Platform

M2M cloud platforms provide a medium to connect smart devices over the Internet. Using these platforms, smart devices (enabled with Ethernet, WiFi, Zigbee, Bluetooth, Z-Wave, RFID, etc.) are able to communicate with each other over the internet. These platforms are further used for monitoring and controlling the devices remotely. Data sent by smart devices is collected by these platforms and data analysis can be done to draw conclusions. These platforms provide support for various M2M features like data storage, device & data management, data analytics, asset location tracking & geo fencing, etc.

This article demonstrates Theft detection application by configuring the smart devices to send data and receive data with Carriots M2M cloud platform. It also provides insights into writing applications on top of the cloud platform for data management, data analysis, sending notifications to the user etc.

In this article you will learn how to:

  • Register the Smart Devices with Carriots cloud
  • Send the Sensor data connected with Arduino Uno board to Carriots cloud using Carriots HTTP REST API
  • Build Alert App on Carriots by programming a Listener to send an email using the SDK

Hardware requirements:

  • Arduino Uno that acts as a  microcontroller
  • Arduino WiFi shield which acts as a gateway device to connect to the M2M cloud platform
  • Photo Sensor to detect surrounding light intensity
  • Resistor (range between 10KΩ and 200KΩ)
  • A Breadboard

Software requirements:

  • Carriots Cloud as an M2M cloud platform
  • A valid Carriots Cloud account
  • Latest version of the Arduino IDE

Device Registration on Carriots Cloud:

For Carriots to uniquely identify and detect the connected device, it uses Device Id and APIKEY.

  • First create an account by registering with Carriots. Carriots will generate an API Key for your account. To view the APIKey, go to your control panel “My account menu” and check APIKey generated for your registered account. It will be a big alphanumeric token similar to: 98346673a6377ef1fde2357ebdcb0da582b150b00cabcd5a0d83045425407
  • All smart devices connected to cloud must be registered with the Carriots first before they can start send the data. For this, you can either create a new device using control panel or modify the dummy device created by the Carriots at the time of account registration

Sending Sensor data to Carriots:

Photo Sensor is connected to Arduino UNO board using bread board as shown in the figure. Using Arduino APIs data collection logic is built into the board to detect the light in the room and to send the same to Carriots.

Arduino connections
Arduino connections


With each request of the device, both the APIKEY and Device Id should be sent to the Carriots along with the data as shown below:

*************************************************************************************************

const String APIKEY = “b182a218a50f6274a8a33ad22a4c22adf0dd5a11b139f23b406538”; // Replace with your Carriots apikey

const String DEVICE = “myDevice@Tarakesh”; // Replace with the id_developer of your device

IPAddress server(82,223,244,60);  // api.carriots.com IP Address

*************************************************************************************************

All the data streams sent by Arduino are collected and stored in Carriots. Carriots uses Nosql database to collect all the information sent by the sensors. Using Carriots, you can build apps quickly with few lines of Groovy code.

Now let’s build an Alert App to send an email in case Arduino detects light. This will alert the owner if someone enters a dark room and turns ‘ON’ the light.

Now once the Arduino WiFi shield establishes connection with the Carriots server, your device must be sending data streams when you turn ON and turn OFF the lights.

Checking the data collected in Carriots

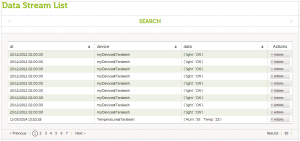
To verify the data sent by the configured smart device, check the control panel if you have new data streams.
Go to “Data management” → “Data streams” and see your data.

Creating an Alert with Carriots Listeners

A listener in Carriots can be associated to any hierarchy entity, from Project to Device. If you associate a listener to a project, all devices below the services of that project will be affected. If you associate a listener to service, all devices below that service will be affected. And so on.

Here I will create a listener associated with my device. This listener waits for an event to occur in the context of the device and then evaluate the content. These listeners are created using carriots SDK with groovy scripting

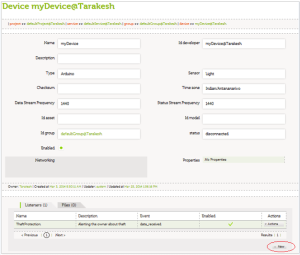
To create a listener, go to the control panel, then to “Device management” → “Devices”. Locate your device and click on the name. Then click on the ‘New’ button in the Listeners tab.

Fill the fields with the following values and save the new listener

Be sure to have your listener enabled if you want it to be executed.

Now test your listener. Send a data stream to this device, check your control panel and your email. Now you know how to connect an Arduino device to send data to Carriots and how to create a simple App with a single Listener and some SDK programming in Groovy!!!

Similary you can use temperature and humidity sensors to send the data to the Carriots cloud. Using this you can analyze the data with Carriots graphs. Below is the graph of the data sent from temperature and humidity sensors.

Temperature/Humidity Sensor Report
Temperature & Humidity Sensor Report


Comparison of Titanium Appacelarator 3.0.2 and Cordova 2.2

With multiple platforms and multi-vendor devices emerging in the market every other day, developing mobile applications that work seamlessly on all these platforms and devices is becoming challenge for enterprises. Creating the apps using native SDK is proving costly for enterprises both in terms of development and maintenance cost.  So enterprises are looking forward for Cross platform development frameworks with single source base and multi-platform deployments.

In this blog we will look at top 2 frameworks, Titanium Appacelarator 3.0.2 and Cordova 2.2 and compare the pros and cons of each framework.

a.   Cordova

Cordova architecture is elegantly designed to take advantage of HTML5 & UI frameworks and providing them with APIs to access the device features. It uses device Web View to render the HTML files. Its runtime engine allows the access to device features by means of common Javascript API calls. It also provides the feature to extend its runtime capabilities by means of custom plugin architecture. Using the custom plugins, developers can also create their own APIs to invoke native functionality that is not provided by Cordova.

At the runtime Cordova uses ‘Web View’ browser to render UI and execute the app. Developers have the flexibility to use standard UI frameworks like JQuery Mobile, Sencha Touch, Dojo Mobile for creating the UI. Cordova is essentially a markup driven development.

b.   Titanium Appcelerator

Appcelerator Titanium on the other hand uses JavaScript has the core development engine for building the mobile apps. Starting from building the UI to the writing process flow logic, it uses JavaScript.

Titanium comes with JavaScript Interpreter that runs directly on the device O/S. This Interpreter evaluates the JavaScript code at runtime by interpreting the code and combining it with the Titanium API (written in targeted device native language). The JavaScript calls to the Titanium API are mapped to native code in the Titanium framework and generate native components. This allows the Titanium to render the Native rich UI and invoke the device features.

Feature Comparison

The fundamental difference between Cordova and Appcelerator Titanium is that, while Cordova is a HTML5 markup based solution, Appcelerator Titanium is a pure JavaScript API that renders natively. Major differences between them are tabled below:

Cordova

Titanium

Development Framework:

Pro: Cordova uses HTML5, JavaScript and CSS3 for creating application UI and functionality

Development Framework:

Con: Titanium uses pure JavaScript & TSS for creating both UI and functionality

3rd Party Framework Integration:

Pro: Cordova allows use of UI frameworks like JQuery Mobile, Sencha Touch and Dojo Mobile

3rd Party Framework Integration:

Con: Titanium does not allow usage of 3rd party frameworks for UI development

Execution Environment:

Con: Cordova depends on device WebView component to render the HTML5 UI

Execution Environment:

Pro: Titanium Interpreter translates the javascript commands to platform specific commands and renders the Native controls

User Experience/Performance:

Con: Since Cordova uses WebView as its execution environment, UI rendering will be slow

User Experience/Performance:

Pro: Titanium provides near Native experience and performance

Platform Support:

Pro: Cordova supports iOS, Android, Windows Phone, Blackberry, Web OS, Symbian etc. by using UI frameworks

Platform Support:

Con: Titanium supports iOS and Android only

Look & Feel:

Pro: Cordova provides consistent UI across all platforms

Look & Feel:

Pro: Titanium provide native look and feel

Debugging:

Pro: Debugging Cordova application is way better than Titanium ones because they depend on the standard Webkit which can be debugged using web developer tools

Debugging:

Con: Titanium does not provide proper debugging tools/methods

Custom Plugins:

Con: Cordova plugin architecture requires separate custom plugin code to be written for each respective platform using Native language

Custom Plugins:

Pro: Single plugin code can be written using Titanium modules. Titanium will take care of generate the platform specific code for the plugin

Offline Data storage:

Pro: Cordova supports localstorage, IndexedDB, and WebSQL

Offline Data storage:

Pro: Titanium supports localstorage, SQLite embedded database

Conclusion

If you are looking to create an app using your existing team with web development skills and want to port it to various diverse platforms and devices easily, then Cordova is the one to go for.  But if your requirement is provide a rich user experience with native look and feel and platform choice is limited to Android and iPhone then Titanium is right choice.

My article on the same topic can also be read at http://www.articlesbase.com/information-technology-articles/comparison-of-cross-platform-mobile-application-development-frameworks-6796941.html

Flashing Firefox OS (B2G) on HTC Explorer (a310e/Pico):

There is a lot buzz around Firefox OS in recent times and I thought of taking a peak at it. Firefox OS, due to its open standards approach and with its strong community base is slowing gaining momentum. Since the device is not launched in our geography, I decided to convert one of my old HTC Android devices to Firefox OS. Since Android device does not come with any restriction on modifying the OS, the users are not bound by any copyright agreements.

So, I started looking at custom ROMs and found one for my HTC Explorer (Pico) referred on these blogs (http://onlytrikss.blogspot.in/2012/11/how-to-root-htc-explorer.html, http://www.rewritetech.com/firefox-os-port-for-the-htc-explorer-pico-1354/). It was highlighted in these blogs that some of the key features (like sim card detection) are not working. But I was very keen to have first-hand experience of Firefox OS, so decided to go ahead with installing Firefox OS.

  • SIM card not detected (Unable to call/SMS)
  • Syncing contacts from GMAIL
  • Camera (Video Recording)
  • Bluetooth
  • Marketplace

I decided to find solutions to make these features work; at least I want to see my SIM card working. After little bit of tweaking, I was able to make few of these non-functioning features work. For the advantage of other users like me, I thought of bringing all these workarounds under one blog. So this article will list all the steps to be followed for flashing Firefox OS on HTC and making all the key features work.

Prerequisites: 

  • Rooted HTC Explorer a310e
  • Make sure that Clockwork Mod and ROM Manager are installed on the device.
  • HTC mobile must be boot loader unlock If not Click here (Note: While following boot loader unlock steps select “All Other Supported Models” to proceed with the further process)
  • If HTC mobile is not a rooted device, then follow the below steps to root the device:

Steps for Rooting Mobile:

  • Minimum 60% Battery backup in the phone.
  • Rootchecker:
    • Make sure that Rootchecker is installed on the mobile device. Rootchecker can be downloaded from play store.
    • Rootchecker allows the user to check whether the phone is properly rooted or not.
  • Download and install HTC sync on your computer.
  • Download A310E Recovery zip file (7.78 MB) for computer and extract it after downloading.
  • Download Superuser  zip file (2.34 MB) for computer and do not extract it after downloading.
  • Install custom recovery by following the below mentioned steps:
    • Remove and insert the phone battery.
    • By pressing volume down and power buttons at a time enter into boot loader mode. (Here use volume up and down buttons for navigation and power button for selection).
    • Now connect the mobile device to the computer via USB cable.
    • From the desktop run recovery.bat file to begin the flashing process.
  • Now create a folder named ”Root” in sdcard and copy the downloaded Superuser.zip file in the Root folder
  • After the completion of installation, disconnect the device from computer and reboot the device
  • Enable USB debugging in the phone  

                          Settings –> Applications –>Development –> USB Debugging

  • Switch off phone and Reboot the mobile into Recovery Mode using this key (hold Volume Up + Power button).
  • Once entered the Recovery mode, select “install zip from SD card” and then select “choose zip from SD Card”.
  • Now SD card will open and select Root folder and choose the “Superuser Zip” file that is copied in above steps.
  • Wait till installation finishes. Now select “Go Back” to see rooting status the phone and then “reboot” the device.
  • Now open root checker and check whether the phone is Root Access or Not.

 Installing Firefox OS:

  • Download Firefox OS B2G from here (http://www.mediafire.com/?5za3c5gq85ml5pe). 
  • Copy the downloaded Zip file in the root directory of the SD card.
  • Before flashing B2G it is recommended to take the backup of the existing ROM. To do this           

                          • Power off the phone and boot into bootloader/fastboot mode by pressing power buttons volume and down simultaneously. 

                         • Choose “Backup and restore” Option in the recovery mode. Now using phone’s  volume keys to scroll to the option saying “wipe data/factory reset” and press the Power button to select it. 

                         • Confirm data wipe by selecting the option saying “Yes — delete all user data”. 

                         • Do the same for the option saying “wipe cache partition”. Now select “wipe dalvik cache” option from “advanced” and then select “format /system” from  “mounts and storage”. 

                         • Install the ROM package transferred to SD Card by stepping back to “Backup and Restore” and select “install Zip from SD card” option. Select the file copied in SD card.

                         • Once the installation process is completed, which takes just about a few minutes, “Reboot the system” to get Firefox OS.

 Solutions for non-functioning features:

 SIM Card functioning:

 Since SIM card is not getting detected, we are unable to make/receive the calls and SMS. To overcome this problem follow the below steps

  • Go to Settings -> Cellular and Data -> Network Operator
  • Select automatic for network operator. Then the device will scan for available network operators. You can see that your network displayed in the list. It will not allow you to select your operator but will automatically detects it
  • With these settings now you will be able to make/receive a call and even SMS will also work. Note: SIM card indicator will still show that it is not detected but all the SIM functions will work

Syncing Contacts from GOOGLE/GMAIL:

By default we will be able to import the contacts from SIM and Facebook. But it is not providing option to sync my contacts from GMAIL. Following the below steps to sync the contacts with Google account:

  • Download the “Importer” app from the Firefox market place and install it
  • On launching the ‘importer’ app, it will check with the configured Google account and prompt the total number of contacts that are found.
  • Just click on the import contacts button and all the contacts from Google account will be imported.

 Functions that worked for me:

  • In some blogs, it is said that SD card is not getting accessed, but I am able to read and write to SD card
  • Initially I was unable to open marketplace and after few attempts I was able to open it and install applications from marketplace.

Issues yet to be resolved:

  • It is not showing the sim card icon (but just ignore it – SIM is detected).
  • Bluetooth and 
  • Video recording

References:

Offline Data Synchronization Using IBM Worklight JSON Store

Introduction:

                This blog provides an overview of JSONStore for offline data synchronization using Apache Cordova integrated IBM Worklight mobile platform for enterprise solutions.

Why JSONStore:

          While creating mobile applications the important thing that comes into picture is handling client side data Storage. There are number of ways to handle the local storage. A couple of them are HTML5 local storage and JSON. HTML5 local storage has a drawback in storing complex data structures like objects. It can store only text keys and strings and it has a storage limit of 5Mb. This problem can be solved by using JSON instead of HTML local storage. JSON is capable of handling more complex data structures like objects in database.  IBM Worklight comes up with JSONStore API that supports offline mode, client-server synchronization and encryption. Currently JSONStore is available for Android and iOS platforms.

Overview of JSONStore:

           JSONStore is an application’s data that have been saved locally and on request, pushed to the back-end service via an adapter.  The local data can be secured by using password-based encryption.  A password based encryption can be done by specifying a password using usePassword() method.  JSONStore enables to search, update and delete the new and existing data without network connectivity

JSONStore feature makes it easy to write applications that work with a client side cache (optionally encrypted) of server side data, and synchronize with the server as connectivity allows. It all starts with the Adapter. An adapter is simply a transport layer used to connect to various backend services.  The application specific data is saved locally in JSONStore on the device. JSONStore communicates with the adapter to perform user actions. The adapter reflects the changes in the data in the backend server. In the same way to retrieve from the   backend the adapter talks to the backend server and gets the data and stores it in JSONStore. The JSONStore stores the data in a file in device’s internal storage. JSON Store doesn’t possess any storage limit like local storage. It takes the available space on the device. On android device the data residing in JSON Store can be found at

/data/data/com.[app-name]/databases/wljsonstore/jsonstore.sqlite

The data residing in the JSONStore can be deleted, updated, added etc. A newly created document stores the data locally. To store it in the backend server user has to push the data by using push method of the adapter. A set of documents can also be pushed at a time by using push method. The documents that are unpushed can also be obtained by calling getPushRequired() method. The documents updating can be done by calling replace() method.  Similarly a particular document can be removed by calling remove() method. 

Creating Adapter:

To create a new adapter Right click on adapter folder

                     Right Click > New > Worklight Adapter

 A new wizard appears where the user can choose his/her own adapter type. Procedures for JSON offline store can be automatically created by selecting the checkbox provided in the wizard.

Deploying Adapter:

 To deploy the Worklight adapter

  Right Click > Run As > Deploy Worklight Adapter

 Then the adapter will be deployed on the Worklight server.

Invoking Adapter:

 Adapters can also be directly invoked by following this procedure

           Right Click on adapter name > Run As > Invoke Worklight Procedure

 A new wizard appears where the procedure to be invoked can be selected. But make sure the input format provided by the user should match the input format expected by the web service. If the adapter call is success it will display JSON formatted output with is Successful field set to true and false if the adapter invocation has failed.

Linking Collection to an Adapter:

 Linking a collection to an adapter allows JSONStore to:

  • Send data from a collection to an IBM Worklight Adapter.
  • Get data from an IBM Worklight Adapter into a collection.

Those  two  can also be achieved using functions  like  WL.Client.invokeProcedure() to transmit and receive data, and getPushRequired()  to get the changes. The collection can be initialized as follows:

usersCollection = WL.JSONStore.initCollection(

              “array”,

              usersSearchFields,

              {adapter: usersAdapterOptions,

              onSuccess: initCollectionSuccessCallback,

              onFailure: genericFailureCallback,

              load:true}),


Adapter options, success callback and a failure callback functions are provided to the collection. When a JSONStore is created by default the following CRUD operations can be obtained from the wizard. For example if the name of the adapter is User the procedures will be as follows:

        <procedure name=getUsers> </procedure>

        <procedure name=“addUser”> </procedure>

        <procedure name=“updateUser”> </procedure>

        <procedure name=“deleteUser”> </procedure>

These procedures can be implemented in adapterimpl.js file. For retrieving data using getUsers the implementation file will be as follows:

 function getUsers() {


       var path = ‘WorklightWS/worklightdemo/UserProfileWS/GetUserProfileData‘;

       var input = {

              method : ‘get’,

              returnedContentType : ‘json’,

              path : path

       };

       return WL.Server.invokeHttp(input);

 }

 Similarly for adding, updating and deleting the implementation logic has to be modified in adapter implementation file.

Implementing Google Maps V2 in KonyOne Cross Platform Mobile Apps

In this post, we will discuss some of the common issues that developers face while implementing Google Maps in mobile apps developed using Kony Studio. Google Maps Android API V1 has been officially deprecated as of December 3rd, 2012. So, all the new apps developed should use an API key of version V2. However, apps using V1 will continue to work on devices. Existing and new developers are encouraged to use Google Maps Android API V2. Here we will talk about the common issues that we face while integrating Google Maps V2 in Kony mobile apps and how to mitigate these issues.

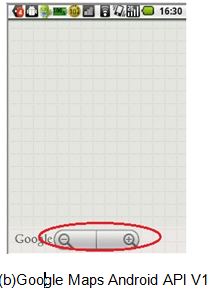
  • While running the app on the device, if you are getting a horizontal zoom bar CaptureCaptureon the Map as shown in fig (b), then your app is using V1 which is no more supported. If you are using Google Maps Android V2 then you will get a vertical zoom on the device as shown in fig(a)
  • Unlike Google Map V1, V2 does not work on emulator, so you need to test it on devices directly. Devices with Android 2.2 and above are only supported by Maps V2.
  • Even after using Google Maps Android V2, if you are getting a blank screen on the device, it may be problem with KonyOne studio version and its plugins. Kony supports Android V2 Maps only from GA-5.0.7 onwards and your android plugins in Kony Studio should be updated to Android-5.0.8. You can download the available 5.0.7 version from http://developer.kony.com/KonyReleaseskony and install it.
  • Now after installing 5.0.7, you will get an option to upgrade to 5.0.11. When you verify the plugin details, you will notice IDE version as – 5.0.7 and Android plugin version as – 5.0.6. You can upgrade it to Kony IDE 5.0.11 & Android 5.0.8 or above, as mentioned below.
  • To update your plugins, from the studio Menu Bar, navigate to “Help” > “Check for Updates”.
  • This will give you the latest plugin details. Select the respected plugin which you want to update and it will update the plugins in your Kony Studio.

Steps to generate android map key and integrating it in Kony application

           To configure Google Maps API Key v2 for Android, follow these steps:

  • You need the Google Maps API key for Android in order to enable Maps in the applications you develop for Android platform. Maps API keys are linked to specific certificate/package pairs, rather than to users or applications. You only need one key for each certificate, no matter how many users you have for an application. Applications that use the same certificate can use the same API key. For generating maps API key for Android, you need to provide the fingerprint of the signed certificate.In the Google Maps Android v2 section, navigate to Displaying Certificate information

Displaying Certificate information

  • The Maps API key is based on a short form of your application’s digital certificate, known as its SHA-1 fingerprint. The fingerprint is a unique text string generated from the commonly used SHA-1 hashing algorithm. Because the fingerprint is itself unique, Google Maps uses it as a way to identify your application. To display the SHA-1 fingerprint for your certificate, first ensure that you have the certificate itself.

             Displaying the debug certificate fingerprint

  • Locate your debug keystore file. The file name is debug.keystore, and is created the first time you build your project. By default, it is stored in the same directory as your Android Virtual Device (AVD) files:
    •  OS X and Linux~/.android/
    • Windows Vista and Windows7C:\Users\your_user_name\.android\
  • List the SHA-1 fingerprint.
    • For Linux or OS X, open a terminal window and enter the following:
      • keytool -list -v -keystore ~/.android/debug.keystore -alias androiddebugkey -storepass  android -keypass android
    • For Windows Vista and Windows 7, run:
      • keytool -list -v -keystore “C:\Users\your_user_name\.android\debug.keystore” -alias androiddebugkey -storepass android -keypass android
  • If your application is registered with the Google Maps Android API v2 service, then you can request an API key. It’s possible to register more than one key per project.
  • To get the key, navigate to the Google API console
  • If your application is not registered with the service, then follow the procedure as mentioned below.
    • Click the Services link from the left-hand menu.
    • Activate the Google Maps API v2 service.
  • In the left navigation bar, click API Access.
  • In the resulting page, click Create New Android Key….
  • In the resulting dialog, enter the SHA-1 fingerprint, then a semicolon, then your application’s package name. For example: BB:0D:AC:74:D3:21:E1:43:67:71:9B:62:91:AF:75;com.example.mapexample
  • The Google APIs Console responds by displaying Key for Android apps (with certificates) followed by a forty-character API key, for example: AIzaSyBdVl-cTICSwYKrZ95SuvNw7dbMuDt1KG0
  • In Kony Studio,Navigate to Application Properties > NativeApp > Android > Tags > Child tag entries under <application> tag. Add the following tag.
    • <meta-data android:name=”com.google.android.maps.v2.API_KEY” android:value=”MapV2-Key”/>
  • Replace the value of the Map V2 key with the generated Map v2 key.

Kony’s approach towards creation of a Mobile Application Development Platform (MADP) tool

Kony is one among the few MADP tool providers which have support for multi-channel applications development, with an ease. In 2012, Kony was positioned as a “Visionary” in Gartner’s Magic Quadrant for Mobile Application Development Platforms.

This blog provides an overview of Kony’s approach towards creation of an MADP tool with capabilities to meet Gartner’s prescription of a good MADP solution, providing a robust platform for mobile application developers.

Integrated Development Environment (IDE)

Kony provides a sophisticated Eclipse-based IDE with a rich set of features. It provides a drag-and-drop form designing interface by following the open standards. KonyOne studio is completely a configuration-based IDE tool. In the entire Kony application development process, writing manual codes comprises only 10-25% of the effort, while the rest of the development involves drag and drops, data mapping editors, configuring property sheets, adding event handlers; all of this is done using GUI controls in the studio.

Developer can directly use the Kony provided cross platform widgets or dynamically create the widgets and use them. Kony Studio helps in mapping the data between different forms as well as between service input/output parameters to fields in a form.

Integrated native emulators and browsers help in testing the mobile applications quickly. IDE helps in visualizing the application form in different themes and verifying the form design changes very quickly.

It is much easier to develop an application with an i18n support, define i18n key/values for each language and apply i18n keys to the widgets using configuration widgets.

Multi-Device O/S support and integration

With Kony, by using a single and common code base, one can develop and build the mobile application for a wide range of mobile platforms like: iOS, Android, Blackberry, Windows Phone, web OS and Java ME.

Kony provides the platform-specific client runtime component that interprets the code generated by the Kony Studio and renders the output in platform specific native language. This brings a greater UI experience and performance to the mobile app.

By using the user-friendly configuration wizards, one can easily customize the Kony applications as per device specific requirements. One can also define the configuration attributes, both, at a non-platform/device specific level as well as to a particular platform/device specific level.

While developing cross platform apps, the developer spends most of the time by tweaking the margins and paddings across different platforms/devices. Apart from pixel based support, Kony also provides a % based margins and padding feature. This will greatly reduce the application development effort.

Packaging and Provisioning Mobile Apps

With a single code base, one can easily build and package mobile applications for multiple platforms. KonyOne studio provides various device-specific options for packaging the application for a specific platform.

Enterprise Application Integration

Kony has the support for connecting to a wide range of backend enterprise systems. Few of the supported enterprise systems connecting services are: XML, JSON, Webservice-SOAP, SAP, SIEBEL and Mainframes. One can use either XML, JSON, or, SOAP based services, for invoking the backend services.

By using its service definition view feature, one can easily define a service and test it. Also, request and response data mapping across different forms and services can be done very easily.

Middleware Server

It provides a middleware server for hosting the services provided by the KonyOne Platform. The services include connecting to the backend systems for fetching the data, application security, and transaction management. The services which are developed using KonyOne Studio will be deployed to the Kony middleware server.

It has a capability for pre- and post- processing of the service request and response messages and sending only the required information to either backed service provider or mobile device. This chunking of data will reduce the data processing load on the device side.

It also provides caching the requested data at the server side using the Kony provided ‘memcache’ server and sends only required data to the device. This helps to greatly reduce the backend service calls.

Security and Remote Management

Kony provides its own Mobile Application Management (MAM) tool for provisioning, deploying and managing mobile applications. It can easily manage the users, applications and devices from a single point.

Kony, without any doubt, is one of the best MADP complaint platforms available in the market. Kony has the support for developing native as well as hybrid mobile applications. However, the Kony platform is more suitable for developing native applications, by using its platform-specific client runtime to render the output in platform-specific native language. This brings greater UI experience and performance to the mobile app

More detailed explanation on this classification is provided in the thought paper published on iGate website.

Read the full blog post here:http://www.igate.com/thought-leadership/konys_approach_towards_creation_of_madp_tool.aspx

Mobile Application Development Platforms (MADP) Classification

With the phenomenal growth of mobile app adoption, enterprises are faced with challenges to develop and maintain the apps that work on all these diverse platforms and devices to reach wider audience. Developers also face the challenge of maintaining consistent look-and-feel across device/OS.

Mobile Application Development Platform (MADP), as the name suggests, provides development tools and frameworks for building Business-to-Employee (B2E) and Business-to-Consumer (B2C) mobile applications. In addition to providing the tools, these platforms also provide middleware servers to connect and synchronize the data with the back end systems, eliminates the duplicate work by allowing business logic to be written and maintained in one place. You can build tighter integration with device features by using these MADP tools.

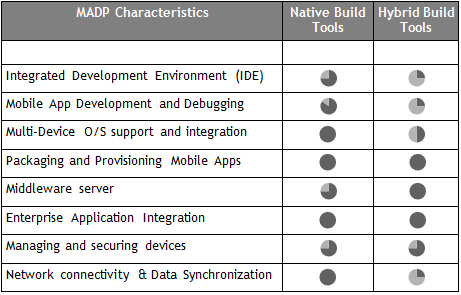
On a broad level these MADP tools can be classified into two categories based on their support for MADP characteristics and their development framework & packaging style:

  • Native Build tools: This is a standard and traditional approach being following by the tool vendors who are in mobile market for long time. Products built on this approach provide sophisticated IDE tools to build application using their propriety frameworks. In this approach it is the responsibility of the tool to make the mobile application device agnostic. Top MDAP products that fall under this category are KonyOne, Verivo, Antenna AMPchroma, Syclo etc.,
  • Hybrid Build tools: As the name suggests mobile apps built using these tools depend on HTML5 hybrid frameworks for building device agnostic applications. Products in this category, primarily concentrate more on providing the middleware server features that act as a gateway between the mobiles apps and backend enterprise systems. Most of these tools use REST Web services for integration with backend systems. Top MDAP products that fall under this category are IBM Worklight, Convertigo, OpenMEAP etc.,

The support level of MADP characteristics by these tools should be more or less in line with the below definition as per the category:

MADP Characteristics Support

More detailed explanation on this classification is provided in my thought paper published on iGate website.

Read the full blog post here: http://www.igate.com/thought-leadership/mobile-application-development-platform-tools.aspx

Social Media Integration with Android 4 and above devices

Social media employ web and mobile-based technologies to support interactive dialogue and communication between organizations, communities, and individuals.

Prior to Android 4.0.x (Ice Cream Sandwich), Android was providing its developers the ability to integrate their apps with the social networking sites primarily by using two ways – 1) by using, SocialAuth Android SDK (Android version of SocialAuth Java library) and 2) by using, Facebook-Android-SDK (provided by Facebook)/Twitter4J (Java library for Twitter API). Another requirement is to create test accounts in the social networking site so that you get the keys and ID’s that would be required by your android app. While Facebook-Android-SDK allows users to share data by creating a share button, the SocialAuth Android library could allow users to choose from list of providers. Implementing this used to be tedious and time consuming process.

With the introduction of SDK 4.0.3 (API Level 15), Android allows developer integrate with any social media service, without writing the sharing code themselves, instead by simply creating a Share Intent. This can be achieved by creating a button (or an options menu or context menu) in your activity and launching the share intent on user action (such as button click). The code snippet is as shown below-

       Intent shareIntent=new Intent(android.content.Intent.ACTION_SEND);

       shareIntent.setType(“text/plain”);

       shareIntent.putExtra(android.content.Intent.EXTRA_SUBJECT,”Some subject”);

       shareIntent.putExtra(android.content.Intent.EXTRA_TEXT,”Text to share”);

       startActivity(Intent.createChooser(shareIntent, “Share via”));

With these five lines of code, you are avoiding the lengthy process of

  • Authenticating, credential storage/management, web API interaction via http posts etc.
  • Registration for obtaining keys and ID’s
  • Coding to the corresponding provider API (Facebook/Twitter etc.


(By Swati Bhat)